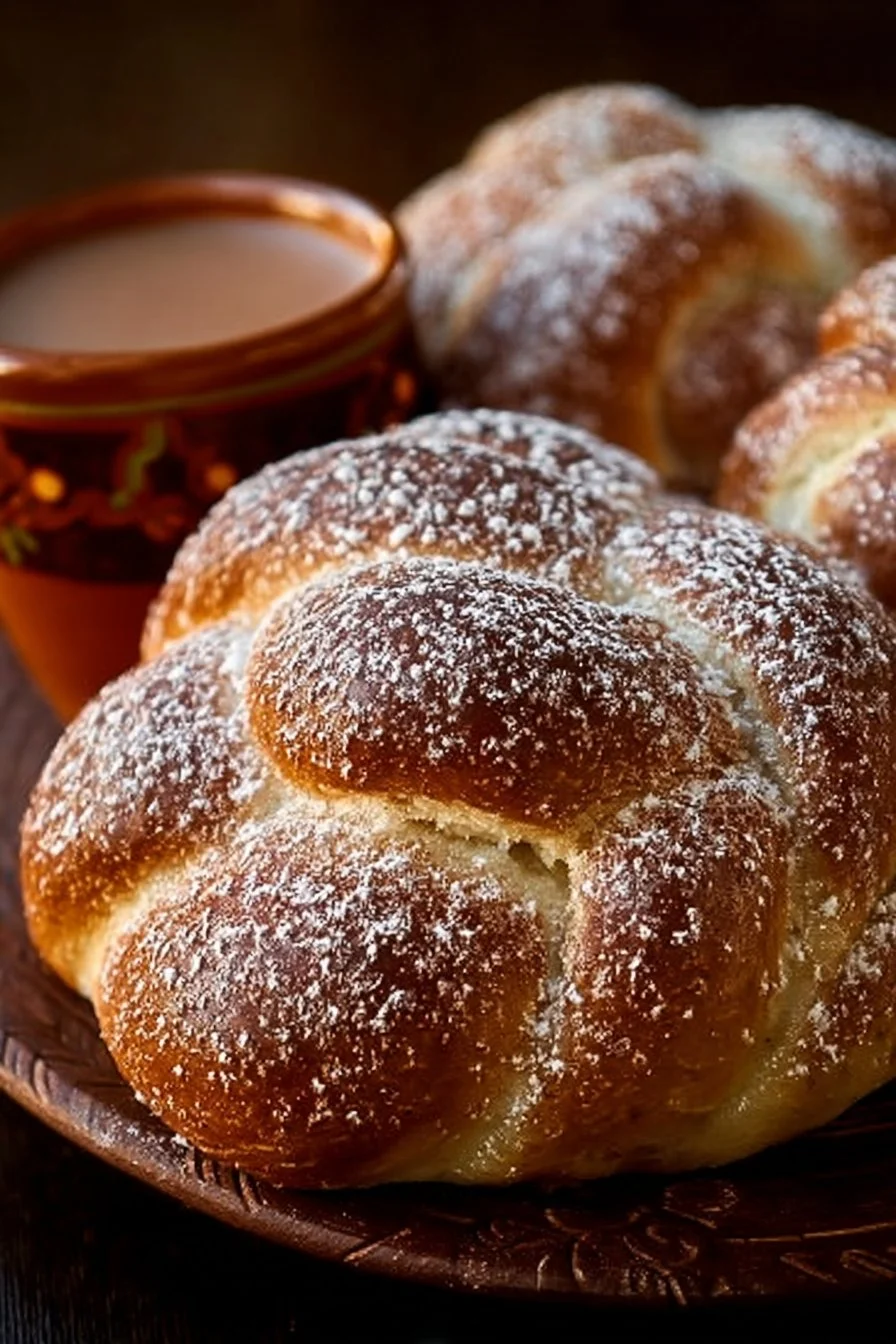
The Best Halloween Bread of the Dead
Are you ready to transform your kitchen into a whimsical wonderland this Halloween season? Look no further than The Best Halloween Bread of the Dead! This delightful recipe combines tradition with taste, making it not just a treat, but a fun project for the whole family. Picture this: golden-brown bread shaped like playful skulls and bones, encapsulating the essence of Halloween in every fluffy, inviting bite. Adding to its charm, the preparation is quick and simple, ensuring you can whip these up just in time for your spookfest. Remember the old saying, “the way to a person’s heart is through their stomach”? Well, with this tantalizing bread, you might find yourself stealing the show!
Much like our beloved pumpkin bread, this recipe brings a special flair to your fall baking. So why not give it a try? Your taste buds and Halloween decorations will thank you!
What is The Best Halloween Bread of the Dead?
So, what’s in a name? The Best Halloween Bread of the Dead sounds a bit spooky, doesn’t it? One might imae a ghostly chef conjuring up a culinary masterpiece for the afterlife! This playful name hails from traditional Mexican bread associated with the Day of the Dead, known as Pan de Muerto. It connects us to our heritage and embraces the spirit of creativity in the kitchen. And it’s not just about the bread; it’s about indulg ourselves and creating memorable experiences. Want to impress your friends and family? Get ready to bake up some magic — they won’t be able to resist asking for second servings!
Why You’ll Love This Halloween Bread of the Dead
There are countless reasons to fall in love with The Best Halloween Bread of the Dead. Let’s focus on three standout aspects:
- Delightfully Unique Shape: The bread’s creative skull and bone shape is guaranteed to bring a playful vibe to your Halloween festivities. Your guests will be excited to dig into these whimsical creations!
- Cost-Effective: Making it at home is not only fun, but it also saves you from overspending on fancy store-bought treats. Why splurge when you can craft your own delicious and fresh bread?
- Customizable Flavors: You can easily customize the flavors to suit your taste — whether you prefer orange zest, cinnamon, or chocolate chips, each variation will make this bread even more delectable.
If you’re a fan of unique baked goods like spooky pumpkin cookies, this Halloween bread is a must-try addition to your recipe collection. So roll up your sleeves and let’s get baking!
How to Make The Best Halloween Bread of the Dead
Quick Overview
Baking The Best Halloween Bread of the Dead is a fulfilling and easy endeavor. With an average preparation and baking time of just under two hours, you’ll have these spooky treats ready to impress without spending all day in the kitchen. The secret lies in the well-balanced ingredients that create a fluffy texture, perfect for satisfying your cravings—both sweet and savory.
Key Ingredients for The Best Halloween Bread of the Dead
Here’s what you’ll need to conjure up this delicious bread:
- 4 cups all-purpose flour: For that fluffy consistency.
- 1 cup granulated sugar: Sweetness that balances the yeast.
- 2 teaspoons active dry yeast: Essential for rising that fluffy shape.
- 1 cup warm milk: Helps activate the yeast.
- 1/2 cup unsalted butter, melted: Adds richness and flavor.
- 3 large eggs: Gives structure and moistness to the bread.
- Zest of 1 orange: Infuses a delightful citrus aroma.
- 1/2 teaspoon salt: Enhances overall flavor.
Step-by-Step Instructions
Now, let’s break down the process:
- Activate the Yeast: In a small bowl, mix warm milk and yeast. Let it sit for about 10 minutes until frothy.
- Combine Wet Ingredients: In a large mixing bowl, combine the melted butter, eggs, orange zest, and sugar. Mix well.
- Mix in Yeast: Add the yeast mixture to the wet ingredients and stir to combine.
- Incorporate Dry Ingredients: Gradually add flour and salt to the wet mixture until a soft dough forms.
- Knead the Dough: Transfer the dough to a lightly floured surface and knead for about 10 minutes until smooth.
- First Rise: Place the dough in a greased bowl, cover it with a clean towel, and let it rise for about an hour or until doubled in size.
- Shape the Dough: Punch down the dough and divide it into smaller portions. Shape them into skulls and bones using molds or by hand.
- Second Rise: Place the shaped dough on a baking tray lined with parchment paper, cover, and let rise for another 30-45 minutes.
- Bake: Preheat your oven to 350°F (180°C). Bake for 20-25 minutes until golden brown.
- Cool and Serve: Once baked, allow them to cool before serving. Optional: dust with powdered sugar for an inviting touch.
What to Serve The Best Halloween Bread of the Dead With
Equally delicious on their own, these spooky treats are perfect when paired with warm drinks like pumpkin spice latte or spiced . You can also serve them alongside a creamy pumpkin soup for a delightful fall meal balance. Feeling adventurous? Try a side of spiced whipped butter for an extra treat!
Top Tips for Perfecting The Best Halloween Bread of the Dead
To elevate your baking experience, here are some handy tips:
- Fresh Ingredients: Ensure your yeast is active by checking its expiration date. Fresh yeast guarantees a fluffy bread.
- Customize Flavors: Don’t hesitate to experiment with flavors! Adding ingredients like chocolate chips, nuts, or dried fruits can enhance your bread.
- Prevent Overbaking: Keep an eye on your bread during the last few minutes of baking. You want them golden brown but not too dark.
Storing and Reheating Tips
After savoring the last bite of your Halloween bread, you might want to store the leftovers. Keep them in an airtight container at room temperature for up to three days. For longer storage, you can freeze the bread. Wrap it tightly in plastic wrap and store in a freezer bag for up to two months. To reheat, simply place in a warm oven for about 10 minutes or toast for a few minutes in a toaster oven for that freshly baked taste.
Get ready to bake The Best Halloween Bread of the Dead, and don’t forget to share your spooky creations with family and friends! Embrace the fun of Halloween and delight in the process of making gourmet treats right from your kitchen. Happy baking!

Halloween Bread of the Dead
Ingredients
Method
- In a small bowl, mix warm milk and yeast. Let it sit for about 10 minutes until frothy.
- In a large mixing bowl, combine the melted butter, eggs, orange zest, and sugar. Mix well.
- Add the yeast mixture to the wet ingredients and stir to combine.
- Gradually add flour and salt to the wet mixture until a soft dough forms.
- Transfer the dough to a lightly floured surface and knead for about 10 minutes until smooth.
- Place the dough in a greased bowl, cover it with a clean towel, and let it rise for about an hour or until doubled in size.
- Punch down the dough and divide it into smaller portions. Shape them into skulls and bones using molds or by hand.
- Place the shaped dough on a baking tray lined with parchment paper, cover, and let rise for another 30-45 minutes.
- Preheat your oven to 350°F (180°C). Bake for 20-25 minutes until golden brown.
- Once baked, allow them to cool before serving. Optional: dust with powdered sugar for an inviting touch.