Sweet & Creamy Strawberry Shortcake Icebox Cake (No Bake!)
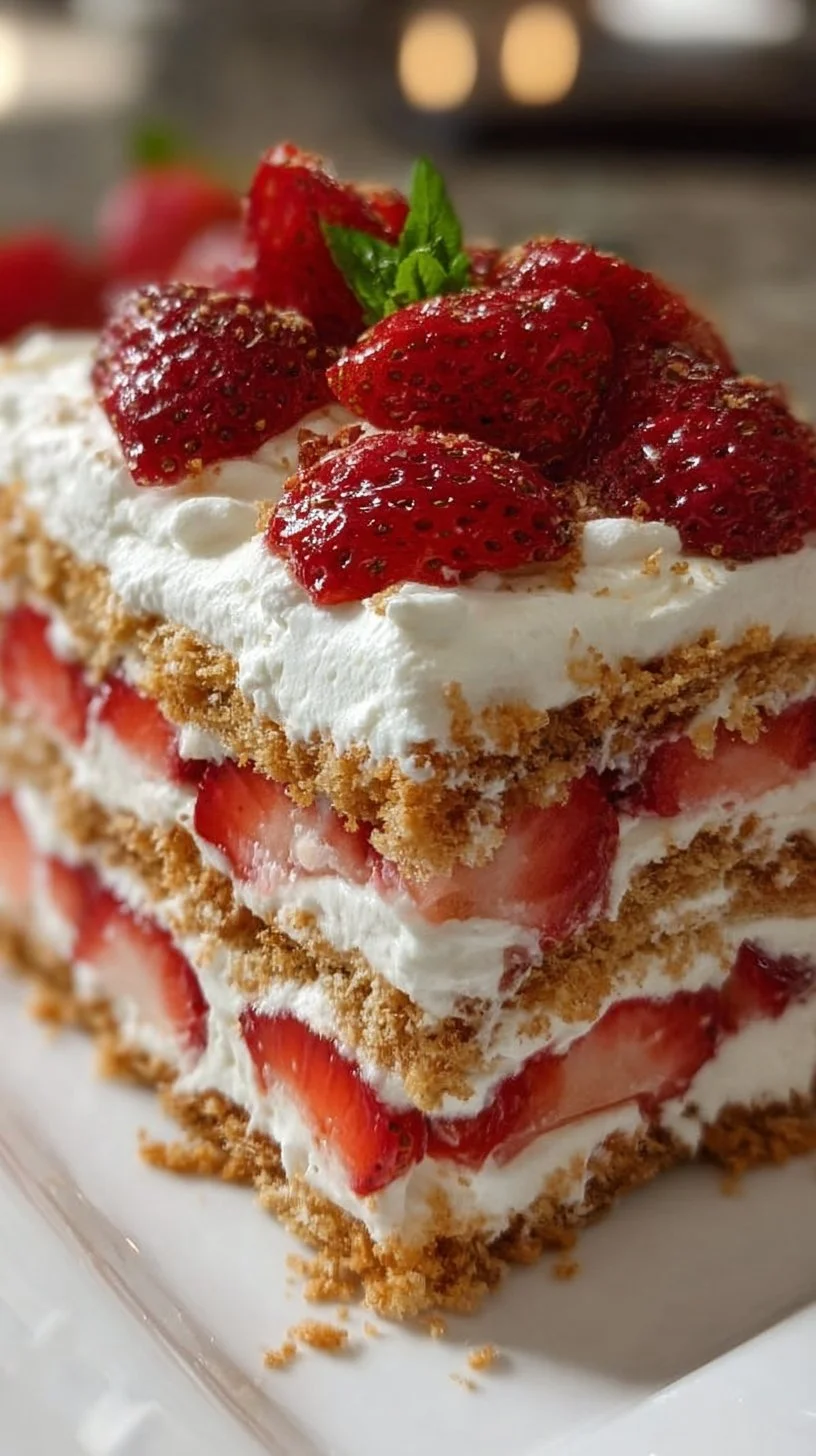
There’s something magical about summer desserts, and the Sweet & Creamy Strawberry Shortcake Icebox Cake is no exception! This no-bake delight is as easy to whip up as it is delicious, boasting layers of creamy, whipped goodness and luscious strawberries that melt in your mouth. Imagine sitting on the porch, a slice of this decadent cake in hand, the sun shining, and the sweet aroma of fresh strawberries wafting through the air—pure bliss! Interestingly, this dessert is rooted in tradition, reminiscent of those picnic-perfect strawberry shortcakes our grandmothers used to make. You won’t be slaving away in front of a hot oven either, making it a fantastic choice for gatherings or a sweet treat after dinner. If you love desserts like our classic No-Bake Chocolate Eclair Cake, this delightful icebox cake is sure to become a favorite in no time. So grab your fresh strawberries and let’s dive into making this delightfully creamy cake!

What is Sweet & Creamy Strawberry Shortcake Icebox Cake?
You might be wondering, what exactly is a Sweet & Creamy Strawberry Shortcake Icebox Cake? Great question! The name says it all—it’s a delightful combination of strawberry shortcake’s rich and creamy flavors, but without the fuss of baking! This layered dessert is known for its luscious cream filling, which pairs perfectly with the juicy, fresh strawberries. Some might say it’s the best of both worlds: you get a traditional shortcake experience but with the convenience of no-bake preparation. They say, “The way to a man’s heart is through his stomach,” and with this cake, you’ll surely win over hearts and taste buds alike! So, why not grab a mixing bowl and give this fabulous icebox creation a try?
Why You’ll Love This Sweet & Creamy Strawberry Shortcake Icebox Cake:
You will love this Sweet & Creamy Strawberry Shortcake Icebox Cake for so many reasons! First, the highlight of this dish is its ultra-creamy texture and delightful layers of fresh strawberries that give it a refreshing twist. Imagine biting into a slice, where every mouthful is like a burst of summer on your palate! Additionally, making this cake at home saves you both time and money—there’s no need for expensive bakery alternatives. Lastly, the toppings of whipped cream and perfectly sweet strawberries elevate the basic ingredients into pure magic. If you’re a fan of desserts like our No-Bake Cheesecake Cups, then this icebox cake will surely make your taste buds sing. So why wait? Gather your ingredients and let’s bring some sweetness into your kitchen!
How to Make Sweet & Creamy Strawberry Shortcake Icebox Cake:
Quick Overview
This Sweet & Creamy Strawberry Shortcake Icebox Cake is not just delicious; it is also incredibly simple to prepare! With a preparation time of about 20 minutes, you can have this stunning dessert ready to chill in the fridge. No baking required, just layer, spread, and stack!
Key Ingredients for Sweet & Creamy Strawberry Shortcake Icebox Cake
- 2 cups of fresh strawberries (sliced)
- 1 cup of heavy whipping cream
- 1 cup of powdered sugar
- 1 teaspoon of vanilla extract
- 1 package of Graham cracker crumbs (about 14.5 oz)
- 8 oz of cream cheese (softened)
- 1 cup of sweetened condensed milk
Step-by-Step Instructions:
- Prepare the Strawberries: Slice your fresh strawberries and set them aside. You can sprinkle a little sugar on them to enhance their sweetness if desired.
- Make the Whipped Cream: In a mixing bowl, beat the heavy whipping cream with ½ cup of powdered sugar and the vanilla extract until soft peaks form. This will take about 3–5 minutes.
- Cream Cheese Mixture: In another bowl, mix the softened cream cheese with the sweetened condensed milk and the remaining ½ cup of powdered sugar until smooth and fully blended.
- Combine Ingredients: Gently fold the whipped cream into the cream cheese mixture until well combined. This creates your creamy filling.
- Layer the Cake: In a rectangular dish, start by placing a layer of Graham cracker crumbs as your base. Then, spread a layer of the cream cheese filling evenly on top, followed by a layer of sliced strawberries. Repeat these layers until you run out of ingredients, finishing with a layer of the cream filling.
- Chill: Cover the dish with plastic wrap and refrigerate for at least 4 hours or overnight. This will help the flavors meld together beautifully.
- Serve: Once chilled, slice, serve, and enjoy the refreshing flavors of summer!
What to Serve Sweet & Creamy Strawberry Shortcake Icebox Cake With:
Pair your Sweet & Creamy Strawberry Shortcake Icebox Cake with a refreshing glass of lemonade or iced tea for a delightful summer treat! You could also serve it alongside a scoop of vanilla ice cream to enhance the creamy goodness. For more variety, consider adding fresh mint leaves on top for an extra burst of flavor or some chocolate shavings for a touch of decadence.
Top Tips for Perfecting Sweet & Creamy Strawberry Shortcake Icebox Cake:
Here are some top tips for ensuring your Sweet & Creamy Strawberry Shortcake Icebox Cake turns out perfectly every time:
- Use Fresh Strawberries: The fresher the strawberries, the more flavorful your cake will be. Look for vibrant red berries with green stems!
- Chill Thoroughly: Allowing the cake to chill overnight not only enhances the flavor but also helps it set perfectly for slicing.
- Substitutions: For a lighter version, consider using Greek yogurt instead of cream cheese, or swap the Graham crackers for crushed vanilla wafers for a different twist.
- Avoid Overmixing: When folding the whipped cream into the cream cheese mixture, be gentle. Overmixing can deflate the whipped cream, resulting in a denser texture.
Storing and Reheating Tips:
To store any leftovers of your Sweet & Creamy Strawberry Shortcake Icebox Cake, cover it tightly with plastic wrap and refrigerate. It’ll stay fresh for about 3–4 days; however, it’s best enjoyed in the first day or two for the ultimate freshness. If you’re thinking about freezing, you can freeze individual slices wrapped in plastic, but keep in mind that the texture may slightly change upon thawing. For best results, serve chilled directly from the fridge or allow it to thaw a bit if frozen.
Now that you’re armed with the recipe and tips, it’s time to bring a splash of bliss into your kitchen! Enjoy making this delicious, no-bake treat that is sure to impress friends and family alike. Happy baking (or should we say, assembling)!


